Warning!!!!: DURING FUEL PRODUCTION AND HANDLING, ALWAYS KEEP IN MIND THAT IT IS IGNITABLE. TAKE PROPER PRECAUTIONS IF THE FUEL WERE TO IGNITE. TREAT FUEL WITH CARE. DO NOT ALLOW FUEL TO TOUCH ANY SOURCE OF HEAT. HAVE FIRE RETARDENT SYSTEMS NEARBY JUST IN CASE (FIRE EXTINGUISHER.) MAKE SURE FUEL IS NOT TO CLOSE TO OPEN FLAME OR HOT OVEN HEATING BARS. USE PROPER HAND PROTECTION (MITTS) WHEN HANDLING HOT OBJECTS, I.E. HOT FUEL, PANS, ETC. AGAIN, I AM NOT RESPONSIBLE FOR ANY DAMAGE. THESES ARE INSTRUCTIONS ARE FOR EDUCATIONAL PURPOSES ONLY AND IT IS YOUR RESPONSIBILITY IF YOU CHOOSE TO ATTEMPT THIS PROJECT.
ALSO, WE ARE WORKING WITH BLACKPOWDER IN THIS SECTION AND THAT INVOLVES ITS OWN SAFETY ISSUE. BLACKPOWDER BY NATURE IS VERY UN-STABLE. READ AND FOLLOW ALL DIRECTIONS POSTED ON THE BLACKPOWER PRODUCT. USE COMMON SENSE...PLEASE. AGAIN I WILL NOT BE RESPONSIBLE IF YOU ATTEMPT THIS OR ANY OTHER SECTION OF THIS PROJECT OR ANYTHING ELSE ON MY SITE. THIS IS POSTED FOR PURELY EDUCATIONAL READING.
Parts list:
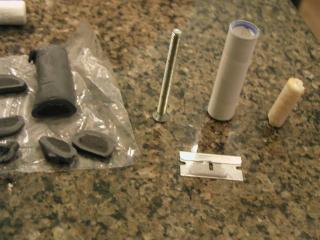
1. 1/2 diameter inch dowel. (just a length that will mash down something inside the tube) ((I used a metal screw for a tool to mash down the putty with))
2. Epoxy Putty (Found in the plumbing Section of hardware store)
3. 2 part 5-minute liquid epoxy.
4. Seperate Larger Airtight Container.
5. Drill Bit
(SIZE?)
6. Black Powder (If you decide to do a motor with an ejection charge)
7. Knife (or other cutting utensil for the putty)
8. Piece of kitchen napkin. Inch square will do for each motor.
Now heres the problem were faced with. You got two options for how you can construct the motor itself. Both of the options have their upside and downsides, especially when you're in-experienced in construction of the motor. After some experience, either option is almost fullproof without failure. The two options for motor construction is just building a motor that will light the propellant or one that will have a delayed ejection charge. That may sound like a simple diffrence at first, buts its quite a change in design overall between the two.
Motor without ejection charge:
Step 1:
Set your tube upright on a flate surface with the nozzle end down.
Step 2:
Insert a fuel propellant grain into the tube with the hollow end core lining up with the nozzle almost perfectly. You can use either end of the grain to get a better line up.
Step 3:
Cut off a 1/4 inch slice of putty and roll it around until its becomes an even greyish color through out (or what the instructions for the putty tell you to do) and place the ball into the tube over the fuel.
Step 4:
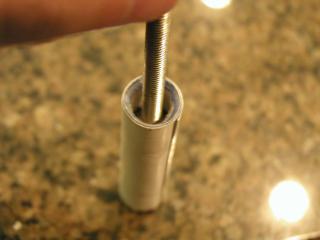
Now compress the epoxy down with the screw until you get a nice compressed layer of epoxy over the fuel with no gaps or holes. If you feel the layer is two thin or if you have little gaps or holes, you can always add a little more epoxy until you feel its safe.
Step 5:
Now store the finished motor in a seperate airtight container thats large enough to hold all of the motors you plan to make. Allow to harden 2-3 hours before you plan to test the motor out.
The upside to the motor without ejection charge is that it uses a stronger endcap to hold the fuel in the tube. The other example with the ejection charge is much more critical that you construct the motor correctly or you could have failure.
Motor WITH ejection charge:
Ok, so I've finally gotten around to experimenting with ejection charges on the rocket motor. Not yet perfected, but I've had 90% success with the ejection charge working with static and dynamic real rocket tests. I think most of the failures are due to me to have yet to perfect construction. This will most likely get better with time, just like how my fuel production got better with experience and practice. Most of the time, im getting an ejection 5 secs, from start of ignition. So here are the steps.
First off, here is what the rocket motor construction with parachute ejection charge looks like for the engine:
Also to make sure you put the correct piece of fuel in the correct order, lets make sure you got the right name for both of the main pieces. The piece with the hollow core on the left and longer than the other is the "FUEL GRAIN". The smaller piece to the right that is shorter than the other is then the header grain. The hollow core allows the whole piece to ignite instataneously and equally. The header grain will burn slower from one side to the other because it does not have a hollow core which will make up the delay charge for the black powder parachute charge.
We weill be working with epoxy. I would recommend the 5-minute epoxy. Also, if you buy the ones with the nozzles close to each other, it is easier to pour the epoxy directly into the tube on top of the header. Also be very careful not to glue your fingers together. Mineral spirits is a good back up if you did happen to glue them together. I've had one of my friends actually do this and I let him freak out for a good 5 minutes until I told him how to get himself free.
So lets begin:
Step 1:
Set your tube upright on a flate surface with the nozzle end down.
Step 2:
Insert a fuel propellant grain into the tube with the hollow end core lining up with the nozzle almost perfectly. You can use either end of the grain to get a better line up.
Step 3:
Cut out a 1/2 inch square piece of tissue place on top of tupe centered.
Use a stick (like the dowel in the molding step) and push the tissue down into the tube on top of the fuel grain.
Step 4:
Mix a glop (quarter sized amount) of exoxy and cover the outside of the header grain. DO NOT COVER THE TOP OR BOTTOM OF THE HEADER GRAIN!!!! Insert the header grain into the top of the tube.
Step 5:
Squeeze out equal amounts of epoxy catalysts into the top of the header grain and mix well to combine the catalysts. Make sure there is no air bubbles between the fuel and the tube. This is key to make sure the header grain works and the fuel does not push out of the top if done wrong prematurely on ignition.
Step 6:
Repeat steps #1 through #5 and set aside tubes to let the epoxy to set up and harden enough for storage. (Probably 10 min. max.) Store drying tubes in airtight container overnight for the next step to allow the epoxy to harden enough for drilling holes into the epoxy top.
Step 7:
Take a 3/8th drill bit and drill a center hole into the top of the epoxy, barely and carefully scraping the first microscopic layers of the header. CAREFUL...THIS IS A DANGEROUS PART OF THE CONTRUCTION!!!!!!! To much friction at this point could start ignition. I will take a picture of this step very soon using a drill press. This can be done with a battery powered drill too, but drill press is much more secure and safer.
Step 8:
Make sure to mark tubes with an identifying symbols to identify non header and header motors. I use "EP/H" to represent "Epoxy with header" and "EP" alone to identify just epoxy NO header. Immediately than store your motors in an airtight container so the fuel does not hygroscopicly deteriate. Occurs in about 2 hours in open air.
Now that we got the motors finished, we just have to go over ignition sources and techniques. Onto the next section we go. So close now.....
Section 6: Ignitor Construction


